America's most shopped online Christmas lights store!
- About Us
- My Account
- Sign Out
- Sign In
- Help
-
1-866-962-7382
Chat Now


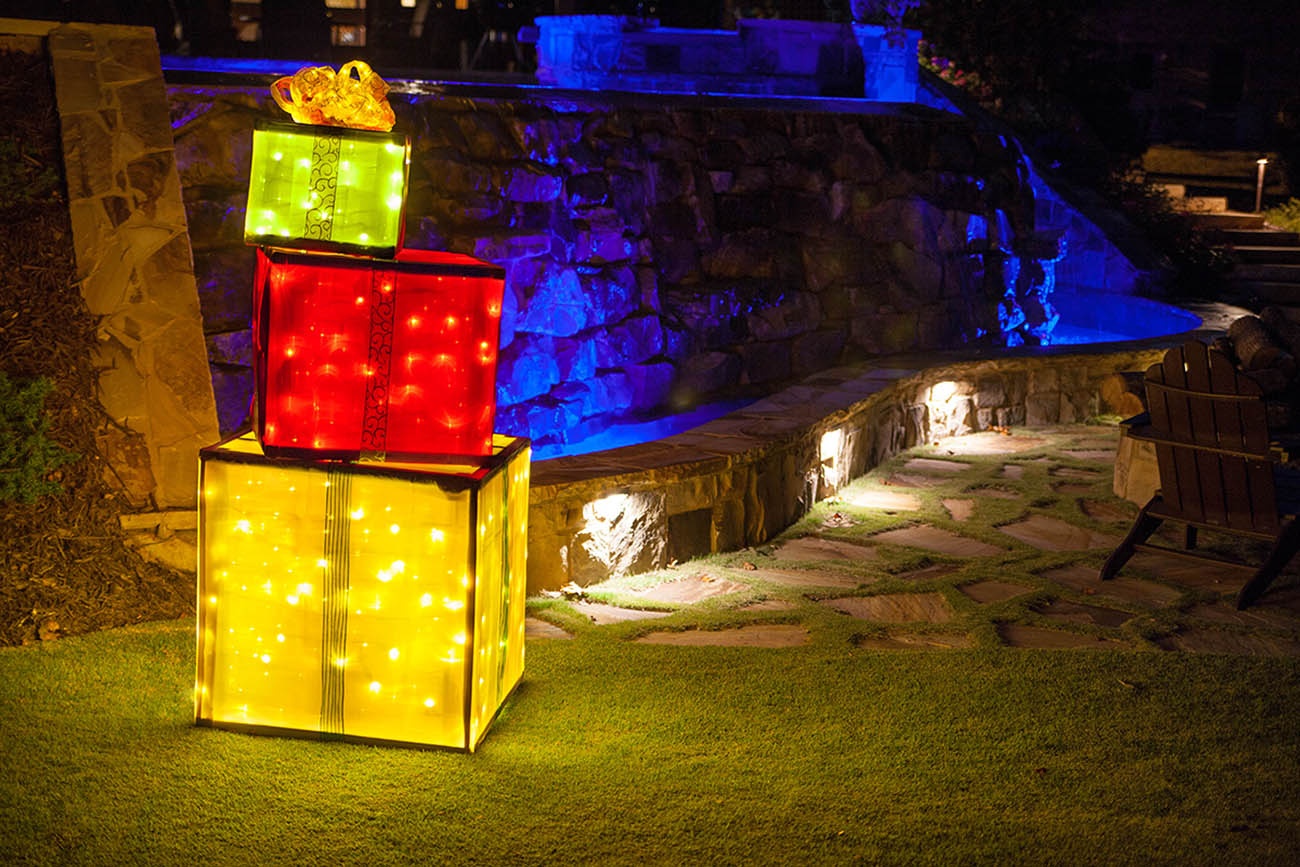
For the sturdiest of DIY lighted Christmas presents, wood frames work best! Follow our step by step guide below to assemble your wooden boxes, then wrap your presents with vivid led lights and outdoor rated fabric. After your project is complete, place your glowing gifts in the yard to create a high impact outdoor Christmas lights display and spread holiday cheer throughout the entire neighborhood this year!

Materials and Tools Needed
The materials list below is based on creating a total of 3 lighted Christmas presents, sized 12 x 15", 18 x 21" and 24 x 27."
Materials
2x2x8' (10)
2" Deck Screws (1lb box)
Nail-In Cable Clips (Bag of 100)
Staples
Sheer Shower Curtain or Outdoor Rated Fabric (3)
Ribbon
Bow
Tools
Saw
Drill/Screw Driver
Tape Measure
Hammer
Drill Bit
Pencil
Gloves (Recommended)
Heavy Duty Stapler
How To Create Your Set Of 3 Lighted Gift Boxes
STEP 1: Cut 2x2x10's into the following:
Small Box-(12) 2x2x12"
Medium Box-(12) 2x2x18" + (2) 2x2x15" as support
Large Box-(12) 2x2x24" + (2) 2x2x21" as support
STEP 2: Pre-Drill screw holes with 7/16th drill bit in 8 out of the 12 pieces of each length of wood. Holes should be drilled in the top and bottom of the boards. Pre-drilling helps to keep the wood from splitting when screwing the pieces together.
STEP 3: Screw together 4 pieces of the same size wood to form a box as shown below. The outside pieces should have the pre-drilled screw holes. Repeat to create the top and the bottom of your frame.
STEP 4: Using the remaining 4 pieces of wood, screw them into the corners of the top and bottom to create your square. Use the pre-drilled holes as guides when screwing your legs into the frame.
STEP 5: Repeat steps 3 and 4 for each size box. As pictured below, use the 2 extra pieces of wood as supports at the top of the medium and larger boxes, screw them into the top of the frame 4 to 6 inches from one side. This creates a base allowing the boxes to sit on top of each other.
STEP 6: Measure and mark the placements for the lights to wrap around your frames. Based on the number of light strands you use in your box, mark each leg where the lights should be attached to the wood to try to keep the vertical spacing even.
STEP 7: Starting at a bottom corner () use the cable clips to attach the lights to the box at your marks from step 6. Continue around the outside of each leg as you work your way from the bottom of the box to the top. You'll want to make sure you leave enough slack in the cord to connect your light string to the outlet and/or box below.
STEP 8: Once your boxes are wrapped in lights make sure that all your connections line up from box to box. It might be easiest to do this as you go, by ensuring that the male end of the middle box can easily connect to the female plug at the top of your bottom box. The smallest box will then connect to the female plug at the top of your middle box.
STEP 9: Wrap your frames using shower curtains our outdoor fabric. This is a very similar technique to wrapping presents. Use the staple gun to attach the shower curtain to the bottom of the frame but make sure to leave the bottom area open.
STEP 10: After all your boxes are wrapped, cut small holes in the top of the medium and large boxes and feed the plugs through. Stack your boxes largest to smallest and connect your light cords from box to box. Connect your larger box to your power outlet and you are done!