America's most shopped online Christmas lights store!
- About Us
- My Account
- Sign Out
- Sign In
- Help
-
1-866-962-7382
Chat Now

4 Basic Steps for Troubleshooting Prelit Trees
Step 1
If the tree has multiple light plugs stacked together, the most common reason for a section not turning on or flickering is often as simple as one of these plugs coming loose. Check that all plugs are secure. If your tree is a power pole or one plug design, check each section where the poles meet to ensure that there is nothing obstructing the connection and that they are seated properly.

Step 2
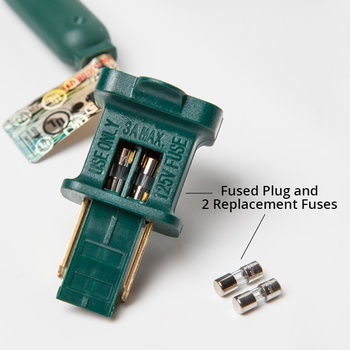
Check the plug fuses. Slide open the door of the plug and replace any fuses that look burnt out. Then plug the strand into an extension cord to see if this fixes the problem. Need help? Watch this video on replacing fuses!

Step 3
If the fuses all look fine or replacing them does not fix the problem, there may be a problem with a bulb or the wiring itself. Replace any damaged bulbs with spare ones. If the issue is with the wire itself, remove the entire string and replace with a new strand of lights. In older trees all of the light wires may need to be removed at some point (snipping them with wire cutters makes the job faster), you can then restring the tree with lights, which will allow you to keep your cherished tree for even longer!
Step 4
If no bulbs are damaged, test each bulb with a bulb tester, these can be found online and in most big box hardware stores.

Troubleshooting Incandescent Prelit Christmas Trees
Troubleshooting LED Trees
LED light strings feature one piece construction, which can make troubleshooting limited. Mini light testers do not work on LED trees. If an LED tree is not lighting, check to make sure all wires are plugged in and fuses are securely seated. An LED light tester can also be used to identify which bulb or socket is not properly functioning.
Many times the main plug that goes to the outlet is not in the lowest section of the tree, which can seem confusing. Larger trees often have 2 or 3 plugs that go into the wall, so look for these if the tree does not light completely. Each of these plugs will also have a fuse, so check to make sure they do not need to be replaced if a section of the tree is not lighting.
Tips for Prelit Christmas Tree Assembly & Storage
Keep in mind that trees do not arrive as pictured. Each tree has its own unique tip shape, which is achieved through a process we call "fluffing". It is best to start by shaping the lowest section of the tree before adding the next section of the tree. This allows each inner tip to be lifted up and out, and many lower branches are expandable, meaning the branch itself can be lifted up or moved to the side, and then the branch tips can also be lifted. Tree tips can be arched downwards, or left to shoot straight out. Plug in lights prior to fluffing each section. For step by step instructions on assembling your tree, visit our Christmas tree setup guide.
Christmas Tree Storage Tips
Are you a tree wrestler? If you spend way too much time trying to shove your fluffed Christmas tree back into the original box that has been taped shut too many times, only to have parts of it busting out of the sides, then the answer is yes! When you take the time to store your tree properly you'll have a beautiful, full tree for longer and you'll get to skip the headache that comes with having to unpack your smashed up tree the following year. The very best option for storing a tree is to use a proper bag for your tree size. Tree storage bags will keep the branches from getting bent and deformed while also protecting the delicate lights, wires, and connectors on your tree.