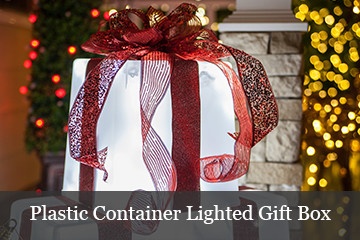
Who doesn't like gifts? Especially very, very big gifts! This DIY Christmas idea takes what we already love about Christmas presents under the tree and showcases them as very large lighted gift boxes for your front yard. It's a large outdoor display of Christmas spirit that evokes the time honored tradition of both receiving and giving gifts, which makes this a great DIY Christmas project

Materials and Tools Needed for PVC Lighted Gift Boxes
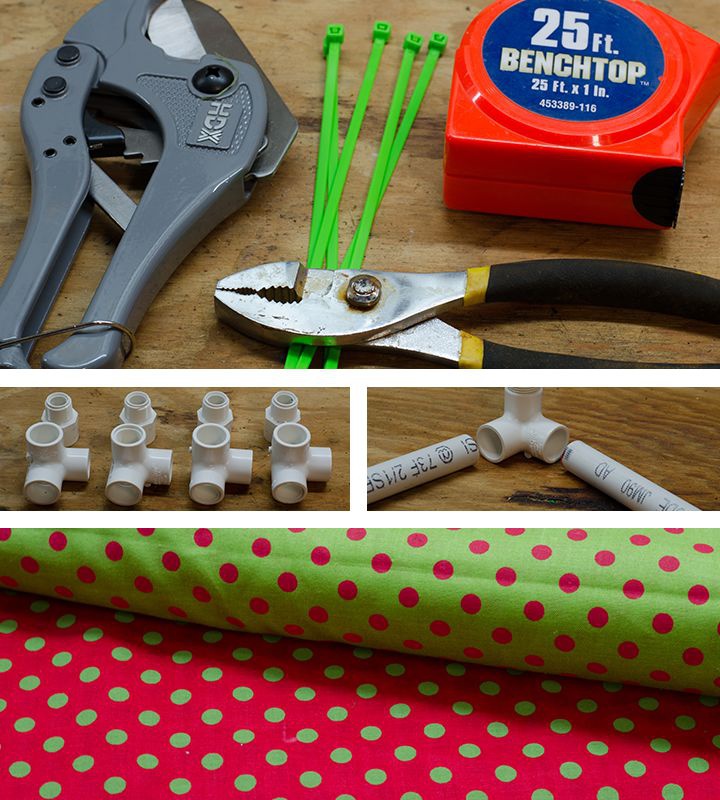
The supplies and tools you need for this project are actually quite simple. They include:
The tools required to make outdoor Christmas boxes are also quite simple. You'll need a tape measure, something to cut your PVC pipe with and some pliars.
TIP: While a utility knife or simple saw can cut PVC, we highly recommend you buy a ratcheting PVC pipe cutter, which most local hardware stores carry for about $20. It's a huge time saver when you have to cut a lot of PVC pipes to different lengths, which this project requires.
Making Outdoor Christmas Lighted Gift Boxes
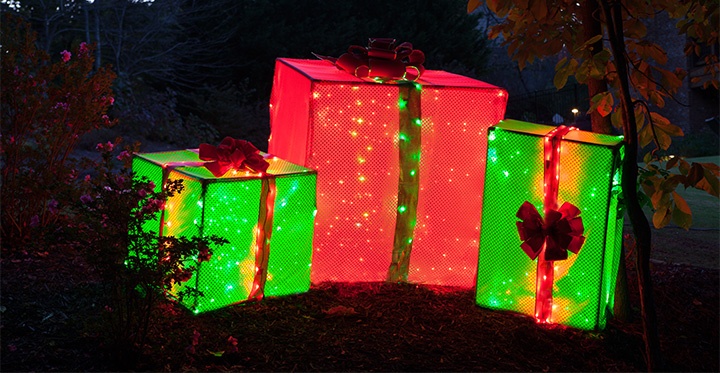
For our DIY idea we wanted to make a scene using three gift boxes. We created:
TIP: You can make lit gift boxes pretty big but for practical reasons we kept our largest box to 4 ft. because most bolts of fabric at fabric stores can be found in this size or smaller, which makes the large presents much easier to wrap. If you make larger boxes you'll have to account for seams, which could entail sewing your fabric together. We wanted to avoid sewing and that's why our largest box was 4ft.
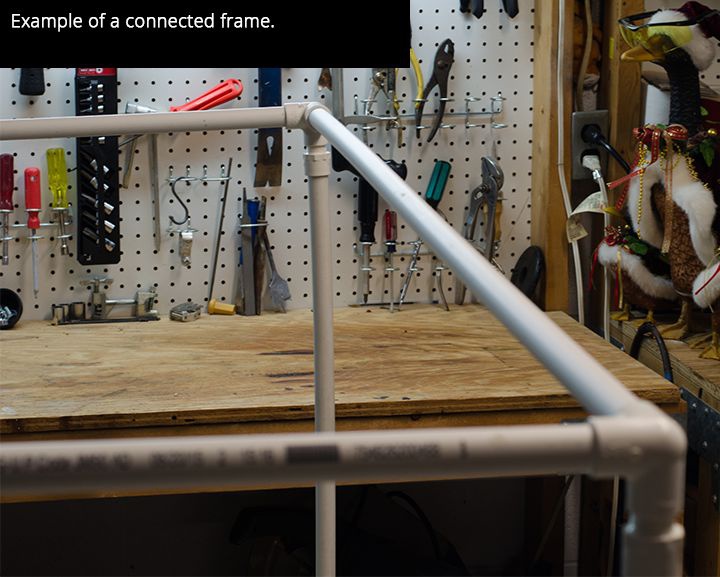
Assembling the Frame
The steps below are specific to the 2.5' box, however the process is similar for all box sizes.
TIP: You DO NOT have to glue your pipes together. We want our lighted gift boxes to store easily and being able to disassemble these boxes when we're done will make them much easier to store year round. A giant box takes up a lot of room, but disassembled these large DIY Christmas presents take up very little space at all. If you need to make your frame stronger, simply press the pipes together more firmly.
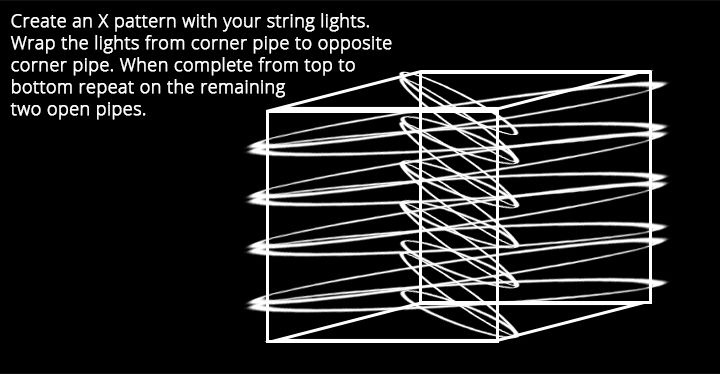
Adding Christmas Lights
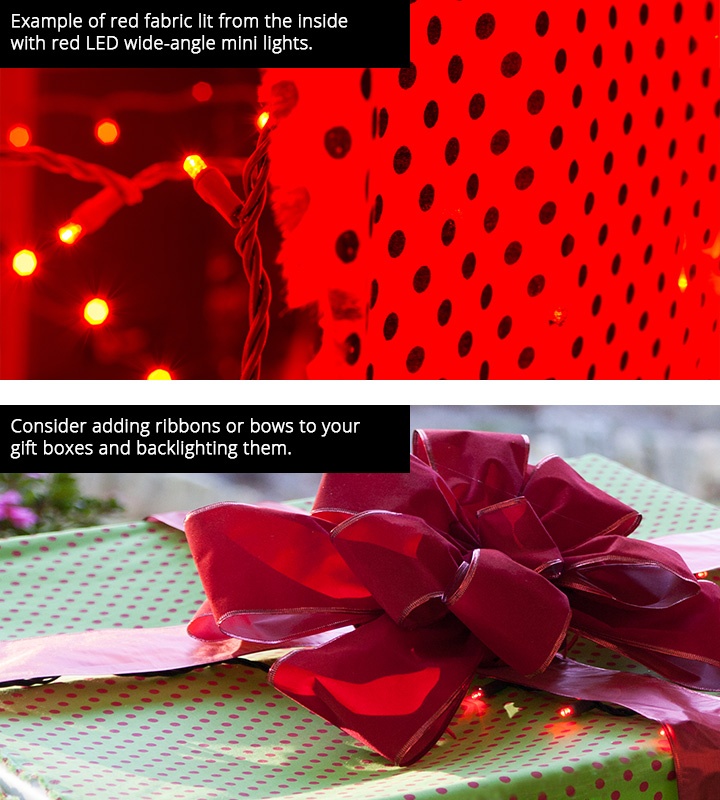
Once your frame is assembled it's time to add LED mini lights. We strongly recommend using LED wide-angle mini lights because they are cool to the touch and won't harm any fabric. They are also extremely bright, which will light the interior of your box well.
Color TIP: Use light colors similar to your fabric. If you have a mostly red fabric gift box, use red lights. If you have mostly green fabric use green lights. If you use white lights with colored fabric it will wash the color out.
How many lights? For a 2.5 ft. box you only need one to two strings of LED mini lights if the strands have at least 70 lights. For our 4 ft. box we used four LED strings. For our 3x1.5 ft. box we used two strings.
Wrap Your Lighted Gift Box with Fabric
Once your frame is complete, give it a quick measure before you cut your fabric just to be safe.
Finishing with Ribbon and Bows
Now that you have a wrapped shape consider adding a few finishing touches like ribbon or bows.
In our examples we chose green ribbons for the red gift boxes and red ribbons for the green gift boxes and then topped each with a bow.
These finishing touches will make your giant outdoor Christmas presents look great during the day and downright amazing at night!
TIP: If you want your ribbons to stand out a little better at night, consider back lighting them with string lights. For example, on our giant red gift box we wrapped the outside with a single strand of green mini lights and then placed a green ribbon on top of them to reinforce the color.
Other Structural Considerations
If you live in a climate with a lot of rain or snow we recommend adding crossbar to the top of your boxes. This can be easily done using a PVC T-connector and an extra pipe. If you add a bow to the top of your lit gift box it'll also keep it from sagging over time.
Giant Outdoor Present Placement
Outdoor gift boxes can go just about anywhere but we recommend placing them next to other natural objects like trees, bushes or within landscaped areas to give them a better sense of size to passersby.
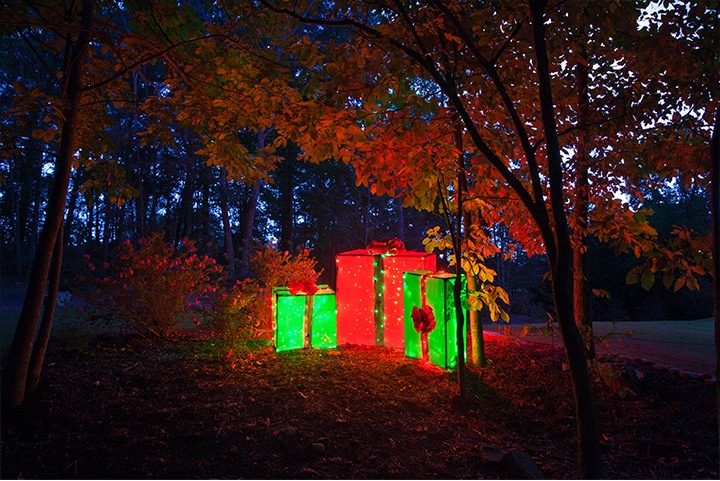
We chose landscaped areas to place our DIY Christmas boxes that could be seen from the street. The setting included several trees and bushes as well. During the day, the giant Christmas presents look great and are clearly distinct as large gift boxes of varying size and proportion.
But...when it gets dark...these lit presents come alive and emit colorful glows that spill onto the trees, bushes and landscaping.
Practical for Assembly and Storage
The nature of large outdoor DIY Christmas projects is that they can be difficult to store when the holidays are over. However, the hidden beauty of this project is that you can remove all the fabric, disassemble all the PVC pipes and literally store them flat on a shelf. They take up very little storage space!
What Does It Cost to Make These?
PVC is very inexpensive and is great for frames like this. Cost will vary depending on how expensive your fabric and lights are and depending on how fancy you make your finishing decorations with ribbons and bows. The good news is there's a way to make giant outdoor lighted presents on a budget.
Can I Just Buy These Somewhere?
No. While some stores sell very small outdoor lit gift boxes they are typically only 12 inches and hard to make out from a distance. Professional decorators make giant Christmas presents but they can cost several thousand dollars and are likely not practical for most Christmas decorating enthusiasts. With a little DIY ingenuity and Christmas creativity you can create your own at a fraction of the cost.
How Long Did It Take to Make These?
About 7-8 hours. We started at 8 AM and had all three boxes done around 6 PM. The PVC pipe cutters save a lot of time and using velcro strips and dots helped to secure the fabric and adjust the fabric quickly.
Tips and Advice
We had a great time doing this DIY Christmas project and highly recommend it to anyone who is interested. If you found this story helpful or interesting, please give us a Facebook Like, Tweet, Pin or share with your friends. Thank you!